
How to Replace & Install the Strut Assembly in Your Car
What is a Strut Assembly?
Together, these car parts form a crucial part of its suspension. They guarantee that your car’s wheels constantly stay in contact with the road surface, thus providing the necessary stability and control so that you have a comfortable ride no matter the road conditions.
Signs You Need a Strut Assembly Replacement
Rough Ride and Poor Handling
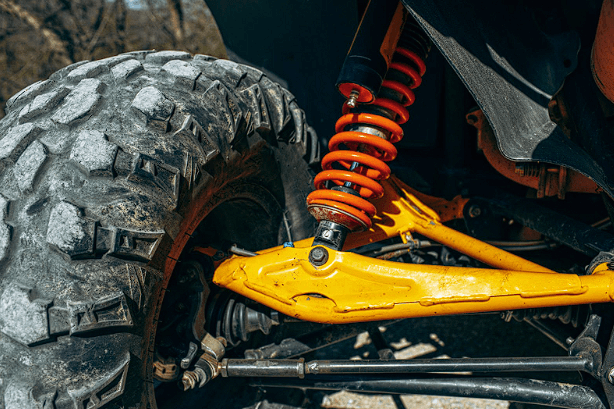
A strut assembly shock absorber close-up
Leaking Fluid
Uneven Tire Wear
This is one of those issues that you shouldn’t overlook, as uneven tire wear affects the longevity of your tires. It can also lead to a loss of traction, bringing your safety into question. Unfortunately, road traffic accidents are still the leading killer of children and young people, so it’s of great importance that you address any potential car issues on time.
Unusual Noise
DIY or Not to DIY – How to Decide?
On the other hand, if you’re uncomfortable with DIY car repairs or lack the necessary tools and workspace, it might be best to leave this job to the professionals. They have the experience and expertise to quickly and safely replace your strut assembly or any other car component, ensuring that it’s done correctly right off the bat.

How to Replace & Install a Strut Assembly
- Begin with Preparation. Find a flat spot to park your car and then engage the parking brake. Loosen the lug nuts on the front wheels, but wait to take them off.
- Remove the Wheel. You should then lift the front of your vehicle with the help of a jack and support it securely with jack stands. Once the front wheels are off the ground, remove the lug nuts and take off the wheels.
- Strut Assembly Removal. Proceed by locating the old strut assembly inside the wheel. You’ll need to remove any bolts or fasteners holding it in place. Carefully lower the assembly from the vehicle once you have everything disconnected. Watch out for any remaining connections or wires as you do this.
- New Strut Assembly Installation. Position the new assembly correctly in the wheel and secure it with bolts or fasteners. Double-check that everything is aligned properly before tightening everything down.
- Put it Back Together. When you finish the new strut assembly replacement, it’s time to reassemble everything. Put the front wheels back on and tighten the lug nuts. Then, lower the vehicle back down and remove the jack stands.
- Perform a Test Drive. A test drive will help you ensure that you’ve installed the new strut assembly correctly and that your car handles as it should.
Get Help From The Pros
If you’re noticing signs like your car is not handling well, making noises, or the ride is feeling bumpy, it’s probably time to check the struts. Here at A Plus Auto, we’re all about helping you keep your car in great condition. With our huge selection of top-quality used auto parts for all kinds of cars, we make it easy for you to find what you need without breaking the bank. Whether you’re fixing your car yourself or getting a pro to help, A Plus Auto is here to help with all your car part needs. Choose us for quality parts and get your car driving smoothly again.